


Piano Lesson 3: 3 Health Issues that Might Affect your Piano Playing
Ready for your third piano lesson? I hope you are feeling enthusiastic about all you are learning about music so far!
[If you are just joining us for the first time, welcome! You will want to first read/watch my Introduction, Lesson 1, and Lesson 2. No need to stress about “catching up” to where we are, you can go at your own pace.]
3.1 Lesson 3: 3 Health Issues that Might Affect Your Piano Playing, the Troublesome 4-finger, and Enjoy the Calm!
This week I wanted to talk a little about 3 health issues that might be affecting your piano playing: Issues with Vision, Hearing and Arthritis. Watch the video below for a discussion about what to do if you experience impairments or arthritic pain that range from annoying to debilitating.
Also, you might have noticed that it is super difficult to play with your 4-finger! It feels kind of land-locked between your 3- and 5-fingers, but the exercises I give you will help your 4-finger to play more independently, over time. Finally, I discuss the soothing effects of playing the piano.
Before we move ahead, let’s review what you have learned so far.
Review, p.1-16
When you play your piano or keyboard, make sure your back remains straight, your shoulders stay relaxed, and check that your arms, wrists and hands are parallel with the floor. Your elbows extend slightly in front of the midline of your body, and your feet are flat on the floor.
Your thumbs are your 1-fingers, your pointers are your 2-fingers, your middle fingers are your 3s, your ring fingers are your 4s, and your pinkies are your 5-fingers. Keep practicing finding C-D-E, G-A-B, E-F-G, A-B-C, and F-G-A up and down your keyboard so that soon you can remove your letter strip.
Pentascales are the first 5 notes of a scale. A major triad is a 3-note chord constructed from the 1st, 3rd and 5th notes of the pentascale. Triads always skip a key and skip a letter name between the notes. If you are a beginner, it will feel awkward trying to play a triad using your 1-3-5 fingers, but it will get easier as you continue to practice your exercises! A half step above a note such as G is called both G# and A-flat. A half step below D is called both D-flat and C# (see p. 8 in Upper Hands Piano, BOOK 1 to review flats and sharps).
Musicians read notes on a staff. Pianists read notes on two staves: the treble staff (where notes are played with the right hand) and the bass staff (where notes are played with the left hand). These two staves together are called The Grand Staff, and are connected with a bar line and a brace at the beginning of each line of music.
As notes move up the staff, they move up to the right on your keyboard. As notes move down on the staff, they move down to the left on your keyboard. We have learned four basic notes:
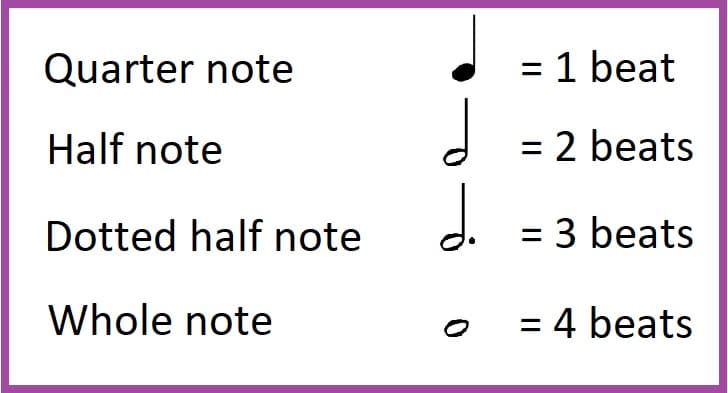
The Quarter Note is played for one beat. The Half Note is played and held for two beats (count “1-2,” “2-3,” or “3-4”). The Dotted Half Note is played and held for 3 beats (count “1-2-3” or “2-3-4”). The Whole Note is played and held for 4 beats (count “1-2-3-4).
Another name for the Treble Clef is the G-Clef, because it indicates that treble G4 (the G above middle C) is on the 2nd line (from the bottom) on the Treble Staff. Another name for the Bass Clef is the F-Clef because it indicates that F3 (the F below middle C) is on the 4th line from the bottom of the Bass Staff. Middle C is written on a Ledger Line below the treble staff. D “kisses the bottom of the staff,” E is on the 1st line, F is in the 1st space, and G is on the 2nd line.
The top number of the 4/4 Time Signature tells there are 4 beats in each measure. The bottom number tells us that a Quarter Note is held for 1 beat.
Moving Forward, p.17-19
Note: If you have not yet purchased my Upper Hands Piano, BOOK 1, you can purchase it from my website. You will need this book in order to continue learning with us.
Turn to p.17 in Upper Hands Piano Book 1. Write the letters in the blanks before each note (not below or above the notes). Writing the letter next to the note helps the brain to associate the letter with that particular note on the staff. Check your answers on the ANSWERS page on my website
3.2 – p.18 Exercises
On p. 18, play these random notes forwards and backwards, one or two lines per day. Though I demonstrate the exercise forwards only, it would be great if you played it both forward and backward, sometimes saying the letters as you play. I count “1-2-3-4” setting a steady beat before I start to play, so that you can play with me, once you feel comfortable to do so.
3.3 – p.19 Au Clair de la Lune
You get to play two short songs on p. 19! Au Claire de la Lune and All Through the Night present different counting challenges! Play each one first before watching my demos. Once again, before playing the songs I count to 4, so that when you are ready, you can play along with me.
Notice that in my Au Clair de la Lune demo, I played a Left Hand G along with the Right Hand C at the beginning of the second line. Once you feel comfortable playing Au Clair de la Lune with your Right Hand all the way through, you might like to add the Left Hand G, as well!
3.4 – p.19 All Through the Night
Notice the “tie” at the end of All Through the Night! The tie means, play the first note, and hold it for the value of both notes. Since we have a whole note tied to another whole note, you will hold the F above the word “night” for 4 + 4 beats, a total of 8 beats.
Passion Practice!
At the end of each lesson, I will provide you with an assignment, called Passion Practice. I call it Passion Practice because: 1- I love alliteration, but also, 2 – we feel passionate about the music of our youth, and that passion can drive us to want to make music, ourselves. If you love music, bring that sense of passion and curiosity to your piano practice.
- Play Exercises #1 in D, A, E and B. You can use the Pentascales Chart at the back of the book to find the new E and B positions, and/or you can watch my video for Exercise #1. There is a list in the description telling you where each Exercise occurs in the video (E is at 4:14 in B is at 4:40).
- For the next two weeks review Ode to Joy on p.16, write the notes in the blanks on p.17, practice 2 lines each practice day on p.18, and the songs on p.19. Once you are comfortable playing pages 18-19 try playing them with my demo!
- Next lesson you are going to write lyrics to a melody! Start thinking about what you would like your first song to be about. It can be silly or serious. Listen to some of your favorite songs or pieces. What is it about them that you like? The lyrics? The melody? The chords? Or the sounds of the instruments or singer?
Let’s Have a Conversation:
Do you have health issues that are affecting your piano playing? How are you coping with those issues? Are you noticing an increase in your ability to concentrate since beginning your piano lessons? Are you finding your practice to be calming? Or stressful? If you have a question or comment, leave it in the COMMENTS section below, because others might have your same question and I’d like to provide answers for all!
Tags Piano Lessons

Thank you for another week of wonderful lessons, Gaili! I love how you talk us through each page of the Upper Hands Piano book and give your excellent piano playing demonstrations, too. This is just what I need! I am a total beginner who, slowly but surely, is making progress thanks to your instruction, motivation and calm demeanour. It is evident that you want your students to succeed and I thank you so very much for these lessons and all your hard work. Thank you, Gaili!
Patricia thanks for your kind words! You made my day :) I’m so glad you are enjoying the lessons, I am loving presenting them! Slow, steady progress is just what we’re going for, so keep it up!
The older woman in the 1st photo of this article is sitting to close to the keyboard. There are 2 tests I suggest to place oneself at the correct distance from the keys. 1) Make a fist and reach out to touch the fallboard. If there is no bend at the elbow, you are sitting far enough away. 2) Place the fingers of one hand on the white keys. If you can place the other fist between your elbow and your ribs, you are sitting far enough away. When you sit too close to the keys, it is difficult to navigate the center section of the keyboard without putting undesirable torque on your wrists.
Dear Kathy, thank you for your comment. Please note that the top image to this article is not meant to illustrate posture, distance or anything else. It is just an image. The instructor of these lessons has provided a thorough description of posture etc. in a previous lesson.
Thank you!
Hi Kathy, yes the woman in the image is sitting too close, and also her wrists are bending downwards which can cause wrist problems. But as Vanya said, this is just an image taken by a photographer and shouldn’t be taken as an example of proper piano posture. We know better, and I will continue to model and review proper posture at the piano. (PS I do like her sweater though! 😊)