


How to Make Stained Glass
Whether you’re drawn to the vibrant colors or the interplay of light and shadow, creating your own stained glass masterpiece is a rewarding and fulfilling endeavor. While learning how to make stained glass may seem intimidating initially, this beginner’s guide will provide you with the essential information and techniques to start your stained glass journey. Let’s dive in!
Essential Tools and Materials
Before starting your first project, you’ll need to invest in a few essential stained glass tools and materials.
Stained Glass Tools
The most crucial tool is a glass cutter, which allows you to precisely score and break your glass. There are various glass cutters, including pencil-style and pistol grip cutters. Experiment with different models to find the one that feels comfortable in your hand and suits your cutting style.
You also need running pliers, which break the glass along the scored line. These pliers have curved jaws that apply pressure on either side of the score, ensuring a clean break. Grozing pliers are handy, too, for shaping and smoothing glass edges after breaking.
Glass Grinder
A glass grinder is a versatile device designed to shape and smooth the edges of glass pieces, allowing for precise fitting and seamless assembly. The grinder comprises a motorized rotating grinder head with a diamond-coated grinding bit.
With its adjustable speed and various grit options, the glass grinder removes sharp edges, creates bevels, and shapes glass pieces to fit perfectly within your desired design. It allows artists to refine their work, ensuring a professional finish and enhancing the quality of their stained glass creations.
Copper Foil
The two primary techniques for assembling stained glass pieces are copper foil and lead came. Copper foil is a thin adhesive-backed copper tape applied to the edges of each glass piece. It allows for intricate detailing. Stained glass artists often use it in smaller projects or designs requiring more flexibility.
Since copper foil is much easier to work with than lead came, it’s a more suitable option. In this article, I will share how to make stained glass with copper foil. Once you have some experience, feel free to experiment with using lead came in your stained glass pieces.
Flux
Flux helps the solder flow smoothly and create strong bonds. You can apply it using a small brush.
Soldering Equipment
Soldering is crucial in stained glass making as it joins the copper foiled or lead came edges together. Look for a soldering iron with adjustable temperature control, and don’t simply buy the least expensive option. The Hakko FX-601 is an excellent choice for stained glass.
Solder, a metal alloy of tin and lead, is used to create the seams that hold the glass pieces together. It comes in various diameters containing different ratios of tin and lead. Beginners often find 60/40 solder easiest to work with due to its low melting point and smooth flow.
Safety Gear
Working with glass and soldering equipment requires safety precautions. Invest in safety glasses or goggles to protect your eyes and heat-resistant gloves to safeguard your hands when handling hot glass or using the soldering iron. Adequate ventilation in your workspace is essential to avoid inhaling fumes produced during soldering.
Glass
Now, the fun part: Glass! Stained glass comes in various colors, textures, and transparencies. As a beginner, starting with a selection of basic colors is helpful to get acquainted with the process. Clear glass is often used as a base, while shades of red, blue, green, and yellow are popular for creating vibrant designs.
Explore different glass textures, such as rippled or seeded, to add visual interest to your projects. Remember that heavily textured glass may be more challenging to work with, especially when soldering. Smooth, thin glass is easy to cut and handle, especially for beginners.
The Process
Now that you have the necessary tools, it’s time to start making your first stained glass masterpiece.
1. Choose or Design a Stained Glass Pattern
Designing your stained glass piece is an exciting and creative process. Start by exploring various inspirational sources, such as books and online resources. You can also create your own designs by sketching or using design software.

Consider the size and complexity of your project, especially as a beginner. Opt for simpler patterns initially, with fewer intricate details and only a few pieces. As you gain confidence, you can challenge yourself with more elaborate designs.
Selecting Colors and Textures
Color selection is crucial in stained glass design. Consider the mood or ambiance you want to convey through your piece. Bright, vibrant colors create a lively and energetic feel, while softer, pastel tones evoke a more tranquil atmosphere.
Experiment with different combinations of colors to achieve the desired visual impact. Consider using complementary or contrasting colors to create dynamic and eye-catching effects. Additionally, incorporating different glass textures can add depth and interest to your design.
Transferring the Design onto the Glass
After choosing a pattern and glass, it’s time to transfer the design. Tracing the design directly onto the glass using a waterproof marker or a wax pencil is a common option. Alternatively, you can make a paper pattern by tracing or printing the design and cutting it out.
Place the paper pattern on the glass, secure it with small strips of tape, and trace around the edges using a marker. Whichever option you choose, be careful. Accuracy is essential in this part of the process.
2. Score and Cut the Glass
The idea of cutting glass seems complicated, but it’s easier than you might think. You may make a few mistakes along the way, but with practice, it’s relatively easy to master. Here’s how to do it:
Score the Glass
Glass cutting involves scoring the surface of the glass to create a controlled break. Hold the glass cutter firmly and at a slight angle to score the glass. Start at the edge of the glass and apply even pressure as you draw the cutter along the marked line. Maintain a steady, continuous motion as you cut from one edge to another. Avoid going over the same area multiple times, which can cause the glass to chip or crack.
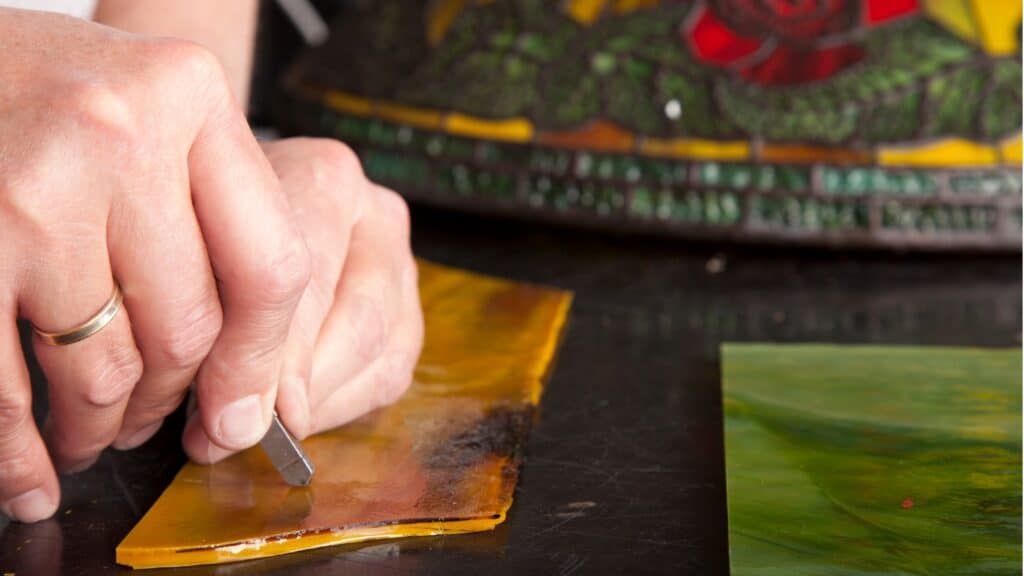
You should hear a distinctive scratching sound as the cutter scores the glass. It’s important to achieve a consistent and well-defined scored line, so press firmly but not hard enough to break the glass.
Break the Glass Along the Scored Line
Place the scored line over the edge of a table or another flat, supportive surface. Hold the glass firmly on both sides of the scored line, ensuring your fingers are clear of the break. Apply downward pressure or a quick snapping motion to break the glass cleanly along the score. Alternatively, gently tap along the back side of the scored line using your glass cutter. Don’t hit it too hard, or the glass will likely break somewhere other than the line.
You may need running pliers for larger pieces or more complex shapes. Some folks also prefer this option for larger pieces. It’s all about finding what works best for you. Position the jaws of the running pliers on either side of the score line, close to the edge of the glass. There should be a small line in the center of the pliers to indicate where to position the jaws. Apply gentle pressure to the pliers to induce a controlled break along the scored line.
Smooth the Edges
Once you’ve broken the glass, the edges may be sharp or uneven. Use grozing pliers to carefully smooth the edges. Grip the glass near the edge with the pliers and gently nibble away small pieces to create a smooth contour. Take care not to remove too much glass or apply excessive pressure, which can alter the piece’s shape.
Next, use a glass grinder to smooth the edges further. Fill the grinder’s base with water, turn it on, then carefully grind each piece to the exact shape needed.
Always wear gloves and safety glasses when cutting and grinding glass. No one wants to cut themself or be injured by flying glass shards!
3. Foil the Edges
The copper foil technique connects pieces of stained glass. A thin strip of adhesive-backed copper foil — which acts as a conductive material for solder — is wrapped around the edges of each glass piece, allowing the glass pieces to be joined. The copper foil technique offers flexibility and precision, making it popular among beginner and experienced stained glass artists.
- Cut a piece of copper foil slightly longer than the edge of the glass you are working with.
- Remove the backing from the foil and carefully align the center of the foil strip with the edge of the glass.
- Press the foil firmly against the glass, ensuring it adheres smoothly and wraps around the edge evenly.
- Continue applying the foil along the entire perimeter, overlapping the ends slightly.
- Use a burnisher or a smooth, rounded tool to firmly press the foil against the glass, ensuring a tight bond.
- Trim away excess foil using a craft knife, following the contour of the glass. Be careful not to cut into the glass itself.
4. Solder and Finish Your Piece
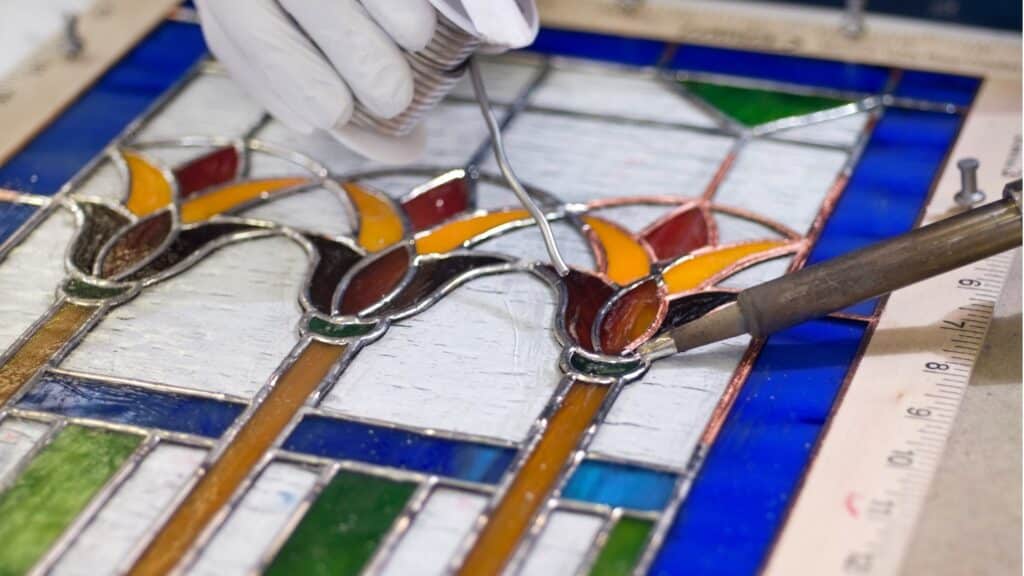
Before you begin soldering, ensure your workspace is well-ventilated to dissipate any fumes produced during the soldering process. Consider using a solder fume extractor or a respirator if working in an area with limited airflow. Once you’ve ensured a safe setup, follow these instructions to solder your glass:
- Preheat your soldering iron to 680-770F (360-410C).
- Apply a thin flux layer to the copper foil using a small brush or flux pen.
- Hold your hot soldering iron against the joint where the copper foil meets the glass. The iron tip should touch the metal and the glass surface.
- Allow the joint to heat up for a few seconds until it reaches the melting point of the metal.
- Touch the solder wire to the heated joint, allowing it to melt and flow into the gap between the glass and the foil.
- Move the solder along the joint, adding enough solder to create a smooth and even seam. The solder should completely cover the copper foil.
- While the solder is still molten, use the soldering iron to smooth and blend the seam. Gently drag the iron along the solder line, ensuring it is uniformly distributed and free of rough edges.
Take care not to overheat the solder or apply excessive pressure, as this can distort the shape of the glass or create unwanted marks.
5. Clean and Finish Your Creation
Once the solder has cooled and solidified, it’s time to clean and finish your stained glass piece.
Cleaning the Solder Seams
Use warm water, dish soap, and a cloth or sponge to wipe away any flux or adhesive residue on the surface of the glass. Avoid scrubbing too vigorously, as this could scratch the glass.
Applying Patina (Optional)
If desired, apply a patina solution to enhance the appearance of the solder seams. Patina comes in various colors and can add depth and richness to your stained glass piece.
Follow the manufacturer’s instructions for applying the patina. Typically, it involves brushing or dabbing the solution onto the solder seams and allowing it to react and darken over time.
After applying the patina, rinse the solder seams with water and dry them thoroughly.
Polishing and Final Touches
- Use a soft cloth or a polishing compound designed for stained glass to gently buff the glass and make it shine.
- Inspect your stained glass piece for any rough edges or imperfections. Make repairs as needed.
With the soldering and finishing steps completed, your stained glass piece is ready to be admired and displayed. The soldered seams should provide structural strength and integrity to your artwork, while the cleaning and finishing steps ensure a professional and polished appearance.
Displaying and Caring for Stained Glass
When displaying your stained glass artwork, selecting the right location is essential. Consider the following factors to ensure optimal visibility and preservation of your piece:
Natural Light
Place your stained glass in an area with ample natural light. The play of light through the colors and textures of the glass will enhance its beauty and create stunning visual effects.
Protection from Direct Sunlight
While natural light is beneficial, prolonged exposure to direct sunlight damages the glass and solder joints. Avoid placing your stained glass in areas with extended direct sunlight exposure.
Stable Temperature and Humidity
Fluctuations in temperature and humidity can adversely affect stained glass. Choose a location with stable environmental conditions to minimize the risk of expansion, contraction, or condensation.
With the basic techniques and information covered in this article, you can learn the basics of making stained glass. Remember to start with the right tools and materials, practice safety precautions, and take your time to develop your skills.
I hope this article has provided valuable insights into making stained glass and ignited your passion for this craft. Please share your thoughts, experiences, or questions in the comments below. I’d love to hear your thoughts!
Let’s Have a Conversation:
Have you decided on a specific design or pattern for your first stained glass project? Do you have any specific challenges or concerns regarding making stained glass? What are your expectations and goals for your stained glass journey?
Tags Arts and Crafts
I love stained glass & took classes, and created many works I loved. But when my husband & I moved onto an RV full-time to travel the country, it wasn’t a practical hobby (storage is limited). But I saved my scrap glass & started doing glass-on-glass art. Not as refined (or labor intensive)as stained glass but still fun & beautiful.
I would love to see some advice on what to look for in lessons. I think I’d need to be shown this in person. It looks beautiful but clearly needs a lot of skill and teaching. I am not finding lessons in my area. Is there an association, world wide or nationally, that lists lessons or groups that sponsor teaching this craft?
Take a class at your local art center if you can. If none are available, watch lots of online videos. This is a craft that takes patience and practice. Have been doing it 30 years and Moy is right–it is getting more expensive all the time. When you start out, focus on safety procedures so they become habit.
This is a very expensive hobby!
I agree – extremely expensive, takes a lot of time, patience, preplanning & dedicated workspace! I was fortunate enough to learn from a neighbor over 20+ years ago. Not good for hands weakened by arthritis either.