


Reconnecting With Baking In Your 60s – Plus My Yummy Skillet Bread Recipe!
Cooking in your 60s is different than when you are younger, don’t you think? When we would younger, we cooked because we had to put food on the table. Our kids were hungry during the day and our husbands came home hungry. So, we would just throw something together to make sure that everyone was full and somewhat happy.
If you were a “housewife” back in the day, you had numerous things to do. Dinner, at the end of the day, was just one of those chores. That said, I can’t say it wasn’t fun. I loved sitting around the dinner table and talking with the kids about their day!
Cooking in My 60s Is Different
Now, in my 60s, I am loving my time in the kitchen! I make what I want, when I want it. Sometimes, I eat breakfast for dinner or a salad for breakfast. It’s all about me at this stage of my life! Chuck, my husband, goes along with it. Hey, he does want to continue to eat, after all.
Now, I take my time and make dishes that interest me and my taste buds. I look for different recipes, and I combine the ones I like to make them my own. Also, I can take my time and even make my dishes look pretty. I can make them spicy… or not. It’s totally up to me!
I’m Getting More Passionate About Bread Lately
So, now I’m really getting into bread. Yes, it takes time and effort. But, the end result is so rewarding and comforting.
It’s a hobby now – one I truly enjoy. It’s also something to do if you’re bored or need space to think.
It fills my head with joy. Here are a few of my recent creations.


Let’s Start with the Basics
The first step is adding the yeast to the water. It’s a simple task, and it’s the first step into your science project. It will foam and become yeasty smelling.
Now, add the flour and, sometimes milk or an egg, and salt. You’re already on your adventure into the stuff of life…!
Expressing My Need to Knead
It takes a little muscle power, but you can do it. All of your ingredients come together into a soft and slightly sticky dough. Add more flour, a little at a time, until the dough becomes soft and you can smell the yeast.
By now, your arms are probably tired, and it’s only been 8 to 10 minutes of your life. These could be the most zen minutes of your life, if you let them.
Rolling the dough with the heels of your hands and pulling back with your fingers, it’s mesmerizing and relaxing. It’s almost an art!
Sometimes, I can’t think of anything better than a slice of homemade bread and some soup. Or perhaps I have a graving for a slice of hot bread, fresh out of the oven and smeared with butter. You really should wait until it cools… but I never can!
My Favorite Recipe for Skillet Bread
Ok, I think I’ve said enough about my love of bread. Let’s get baking together! Here’s my favorite recipe for skillet bread.
The following ingredients will make two loaves
- 1 package of active dry yeast or 2 1/2 teaspoons of yeast.
- 2 cups of water. If you measure the temperature, it should be about 110 F.
- 1 tablespoon of salt.
- 6-8 cups of flour.
- Cornmeal. I use it under the bread, before baking and sprinkle a little on top.
- 1 egg yolk, mixed with 1 tablespoon of water. Brush this on top of the bread before baking.
Here’s how to get started
- Mix the yeast and water together and let your creation set for 10 minutes.
- Add the salt and mix.
- Add the flour, a little at a time.
- Mix with a spoon and keep adding flour until it’s not too sticky. I use about 6 cups.
- Knead for about 10 minutes.
- Add flour, as needed, until the mixture is smooth and elastic.
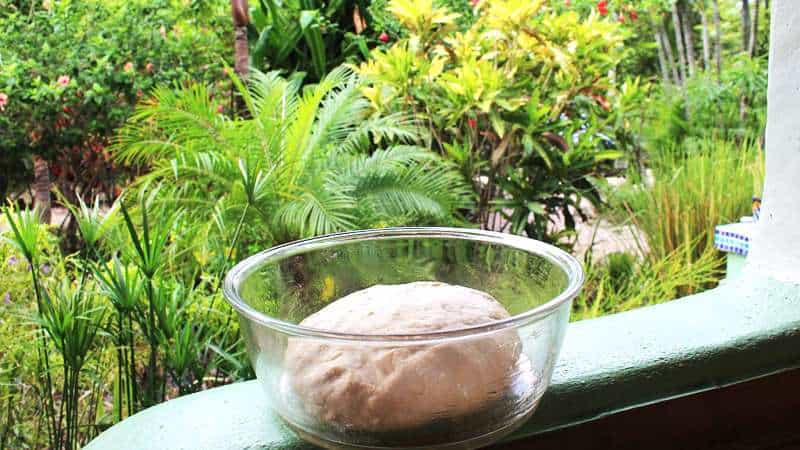
- Shape it into a ball and put this in a large bowl, coated lightly with oil. I use olive oil.
- Cover with a cloth.
- Let the bread rise in warm place until it doubles in size. My dough takes about 2 1/2 hrs – it’s hot here in the jungle. Yours might take longer!
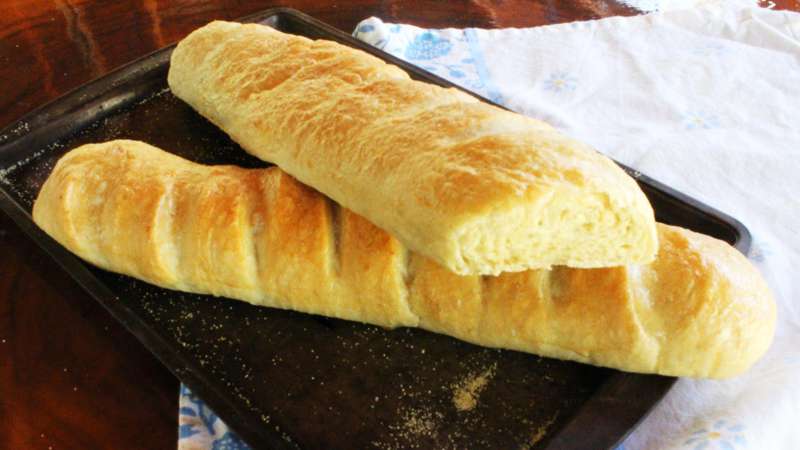
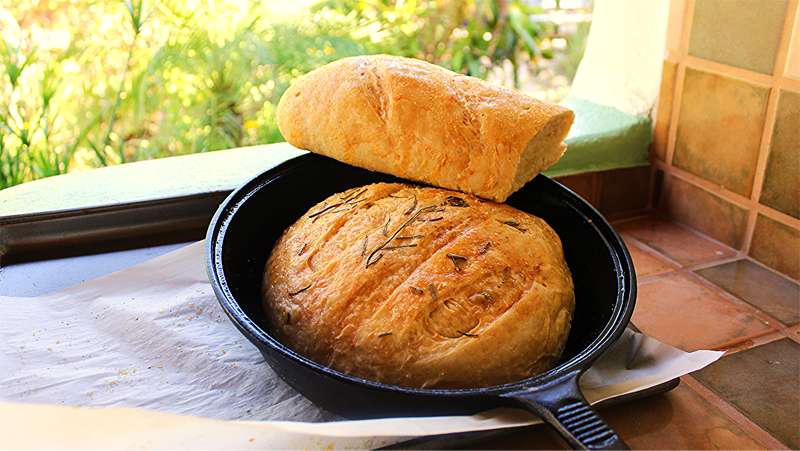
- When your dough has doubled in size, put it on a lightly floured surface and cut it in half. I put one half in my cast iron pan that I have sprinkled with cornmeal and the other half I shape into a baguette.
- Next, I press it lightly into a rectangle and roll it up. I start at the long ends and pinch the seam together, tucking the short end under.
- Place your creation on a cookie sheet with parchment paper, sprinkled with cornmeal. At this point, I use a razor blade and make three slashes on top of each loaf. For this batch, you can see that I got a little fancy with the rosemary and chives. Let it rise again for 1/2 hour to 45 minutes.
- Brush the bread with the egg mixture and bake in the oven at 400 degree F for about 40 minutes, or until the temp inside the bread is 190-200 F. I put a pan on the bottom rack and pour hot water into it when I put the bread in the oven. Close the door fast, so that your water turns into steam.
Now, you’ve made a beautiful loaf of bread at home. Enjoy!
Let’s Have a Conversation:
What did your cooking look like back in the day? How is it different now that you’re over 60? Do you think you might start cooking or baking something you really like? What is your favorite bread recipe? Please join the conversation.
Tags Creativity Recipes

I enjoy cooking more now as I have time to try new recipes and new ingredients. The internet makes it very easy to look up a recipe and see what it should look like as well as reviews! I did enjoy cooking for my family as it was very important to my late husband and I that we eat together as a family and share our day together. I just started making sourdough bread about 1 year ago. My favorite bread so far is cranberry walnut sourdough bread. It is delicious as is and also as French toast! I also like the “everything” crackers and sourdough pancakes.
I wish I could know how to do this with non wheat flour
Me too!
A cookie sheet with parchment, or a skillet? And what gets pressed into a rectangle…? Wouldn’t the skillet bread be a rounded shape? I guess I got a little confused in the directions…
What kind of flour? I prefer whole grain bread, will whole wheat or rye work or does it need to be a combination of flours? I also find relaxation and creativity in cooking, then you can enjoy and share your efforts! Feed and nurture yourself and those you love. Always kind when someone not feeling well or to add to a celebration or just enjoy for yourself!